MGA KAKAILANGANIN
1. VPS SERVICE (KAYO NA BAHALA HUMANAP NG VPS SERVICE NA GUSTO NYO.
(5 Days Free VPS trial HERE)2. PUTTY TELNET Client or Bitvise Tunnelier - para ma-access nyo ang server nyo.
Bitvise Tunnelier
INSTRUCTIONS
1. Install nyo muna yung OS ng server nyo (CentOS preferrably)
2. kapag nainstall na check natin kung enabled yung TUN/TAP
#cat /dev/net/tun
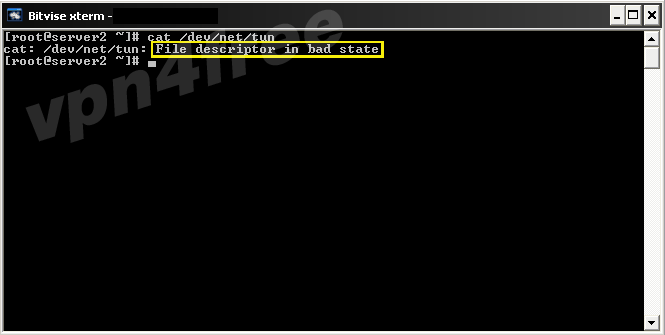
kapag ganyan yung lumabas it means enabled na yung TUN/TAP
3. #yum install gcc make

4. idownload natin yung OPENVPN package
#wget http://openvpn.net/release/lzo-1.08-4.rf.src.rpm
5. idownload naman yung OPENVPN repository
if you're using 32bit version
#wget http://dag.wieers.com/rpm/packages/r...l5.rf.i386.rpm
if you're using 64bit version
#wget http://dag.wieers.com/rpm/packages/r....rf.x86_64.rpm
(para malaman kung anong architecture gamit nyo eto ang command
#uname -a)
6. install na natin ung package na kailangan ng OPENVPN
#yum install rpm-build
#yum install autoconf.noarch
#yum install zlib-devel
#yum install pam-devel
#yum install openssl-devel
7. Install the downloaded rpm package and add the repository to your CentOS
#rpmbuild --rebuild lzo-1.08-4.rf.src.rpm
#rpm -Uvh /usr/src/redhat/RPMS/x86_64/lzo-*.rpm
#rpm -Uvh rpmforge-release-0.3.6-1.el5.rf.x86_64.rpm
*** note: check nyo ung architecture, kung 32 bit gamit nyo palitan lang yung "x86_64" ng "i386"
8. Install OPENVPN
#yum install openvpn
9. Copy the folder para makapagcreate tayo ng certificate sa directory /etc/openvpn/
#cp -r /usr/share/doc/openvpn-2.0.9/easy-rsa/ /etc/openvpn/
10. Gawa tayo ng certificate para sa server
#cd /etc/openvpn/easy-rsa/2.0
#chmod 755 *
#source ./vars
#./vars
#./clean-all
#./build-ca
(sagutan lang ung mga fields doon gaya nito)
Generating a 1024 bit RSA private key
.................................................. ..................++++++
..............................................++++ ++
writing new private key to 'ca.key'
-----
You are about to be asked to enter information that will be incorporated
into your certificate request.
What you are about to enter is what is called a Distinguished Name or a DN.
There are quite a few fields but you can leave some blank
For some fields there will be a default value,
If you enter '.', the field will be left blank.
-----
Country Name (2 letter code) [US]:
State or Province Name (full name) [CA]:
Locality Name (eg, city) [SanFrancisco]:
Organization Name (eg, company) [Fort-Funston]:
Organizational Unit Name (eg, section) []:
Common Name (eg, your name or your server's hostname) [Fort-Funston CA]:
Email Address [me@myhost.mydomain]:
11. Gawa tayo ng key Server
#./build-key-server server
(parehas lang ng sa step 10 pero sa "Common Name" dapat
server ang ilalagay
12. Build Diffie Hellman
#./build-dh
13. gawa naman tayo ng configuration sa /etc/openvpn
#cd /etc/openvpn
#nano server.conf
(sample configuration file)
local 123.123.123.123 #- change it with your server ip address
port 1234 #- change the port you want
proto udp #- protocol can be tcp or udp
dev tun
tun-mtu 1500
tun-mtu-extra 32
mssfix 1450
ca /etc/openvpn/easy-rsa/2.0/keys/ca.crt
cert /etc/openvpn/easy-rsa/2.0/keys/server.crt
key /etc/openvpn/easy-rsa/2.0/keys/server.key
dh /etc/openvpn/easy-rsa/2.0/keys/dh1024.pem
plugin /usr/share/openvpn/plugin/lib/openvpn-auth-pam.so /etc/pam.d/login
client-cert-not-required
username-as-common-name
server 10.8.0.0 255.255.255.0
push "redirect-gateway def1"
push "dhcp-option DNS 208.67.222.222"
push "dhcp-option DNS 4.2.2.1"
keepalive 5 30
comp-lzo
persist-key
persist-tun
status server-tcp.log
verb 314. Start na natin OPENVPN
#openvpn /etc/openvpn/server.conf
(ganito magiging itsura nyan pag ready na yung OPENVPN)

15. gawa naman tayo ng
iptables pra maaccess natin ung internet gamit yung OPENVPN server natin
#echo 1 > /proc/sys/net/ipv4/ip_forward
(On reboot the ip_forward will be disabled, to make ip_forward persistent edit etc/sysctl.conf
net.ipv4.ip_forward = 1)
#iptables -t nat -A POSTROUTING -s 10.8.0.0/24 -j SNAT --to 123.123.123.123
(palitan ang 123.123.123.123 ng ip address ng server nyo)
16. gawa na kayo ng user id
#useradd username -s /bin/false
#passwd username
17. pra makapag delete ng user id
#userdel username
18. ngayon gawa naman tayo ng client config. (using notepad)
sample client config..
client
dev tun
proto tcp
remote 123.123.123.123 4567 #- your OPENVPN server ip and port
resolv-retry infinite
nobind
tun-mtu 1500
tun-mtu-extra 32
mssfix 1450
persist-key
persist-tun
ca ca.crt
auth-user-pass
comp-lzo
verb 3(save nyo yan with extention
.ovpn)
19. download ca.crt file in directory /etc/openvpn/easy-rsa/2.0/keys to your PC and save to the OPENVPN GUI config folder.

(gamitin nyo ung sftp ng bitvise sa pagdodownload ng
ca.crt, ca.key, server.crt, server.key20. Pwede na kayo maglog in sa vpn nyo. gamit lang kayo ng openvpn
client din ilagay nyo ung ginawa nyong config sa notepad and ung mga
dinownload nyo sa bitvise sftp sa config ng openvpn client nyo..
for more details click here
(credits)